
Where Does Most Heat Escape From a House?
If you're fighting ice dams every winter, paying heating bills that make you wince, or noticing drafts that never seem to go away, you're dealing with a house that's hemorrhaging heat. And if you live in the northern snow belt, that escaping heat isn't just costing you money—it's melting snow on your roof and creating the conditions for ice dams and water damage.
Understanding where your house loses heat—and why—is the first step toward solving both problems at once. This guide breaks down the science, identifies the biggest culprits, and shows you exactly where to focus your efforts.
Table of Contents
- Who This Guide Is For
- The Biggest Sources of Heat Loss (Ranked)
- Why the Attic Is the Ice Dam Connection
- Hidden Air Leaks You Can't See
- What Pushes Heat Loss Higher vs. Lower
- The Stack Effect: Why Warm Air Wants Out
- How to Diagnose Where Your House Is Losing Heat
- Priority Action Plan: Where to Start
- Common Questions
Who This Guide Is For
The Ice Dam Repeater
You've had ice dams multiple winters in a row. You know removing the ice treats the symptom, but you want to understand the root cause so you can stop the cycle for good.
The High-Bill Homeowner
Your heating bills are higher than your neighbors', your furnace runs constantly, and you suspect your house is losing heat somewhere but don't know where to look first.
The Prevention Planner
You haven't had major ice dam damage yet, but you see small ridges forming and want to understand what changes will actually prevent problems before they start.
The Biggest Sources of Heat Loss (Ranked)
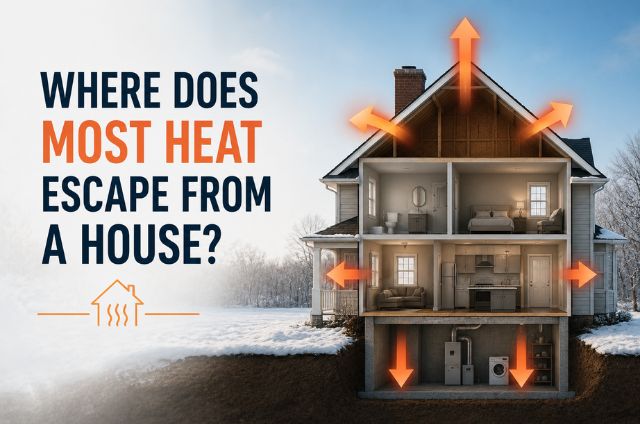
Not all parts of your house leak heat equally. Here's where the real losses happen, ranked by impact on your heating bill and ice dam risk.
Attic: 25-35% of Total Heat Loss
Why it matters for ice dams: Warm air rises. Your attic is where that rising heat accumulates, and if it's not properly insulated and sealed, it flows directly through the roof deck, warming it from below and melting snow.
Common problems: Insufficient insulation depth (less than R-38), compressed or damaged insulation, major air leaks around penetrations, bypasses that let conditioned air into the attic.
Windows: 15-25% of Total Heat Loss
Why it matters: Glass conducts heat much faster than insulated walls. Single-pane windows are thermal disasters. Even modern double-pane windows lose more heat per square foot than a properly insulated wall.
Common problems: Old single-pane windows, damaged seals on double-pane units (condensation between panes is the telltale sign), air leaks around frames and sashes.
Walls: 15-25% of Total Heat Loss
Why it matters: Exterior walls represent a huge surface area. Older homes often have minimal wall insulation—sometimes just R-7 or less in the cavities, or none at all in solid masonry construction.
Common problems: Uninsulated walls in homes built before the 1950s, settled or compressed fiberglass in older insulated walls, air leakage at the top and bottom plates where walls meet attic and basement.
Air Leaks & Penetrations: 15-20% of Total Heat Loss
Why it matters: Air leakage is often more significant than insulation alone. Warm air physically escapes through cracks, gaps, and holes, carrying its heat with it. This category includes doors, electrical outlets, plumbing penetrations, and all the hidden gaps in your building envelope.
Common problems: Recessed lights without airtight housings, gaps around chimney chases, plumbing stack penetrations, unsealed attic hatches, leaky basement rim joists.
Basement and foundation losses account for another 10-15%, but they're typically less relevant to ice dam formation since that heat isn't rising through the roof plane.
Why the Attic Is the Ice Dam Connection
Windows and walls lose heat, but they don't create ice dams. The attic is different because of its position and function.
Warm air naturally rises through your home due to buoyancy—this is basic physics. That rising air collects in the attic, which sits directly beneath your roof deck. If the attic floor isn't properly insulated and air-sealed, heat continues upward through the roof sheathing.
This escaping heat warms the underside of your shingles from below. Even when outdoor air temperature is 20°F, the roof surface temperature might be 35-40°F. That's warm enough to melt the bottom layer of snow.
The ice dam mechanism: Meltwater runs down the warm roof sections until it reaches the cold eaves (where there's no heated space below). There it refreezes. Over time, a growing ridge of ice forms, blocking drainage. Subsequent meltwater backs up behind this ice dam and eventually finds its way under shingles and into your home.
Heat loss through walls and windows doesn't cause this problem because those surfaces aren't covered in snow and don't create the warm-roof/cold-eave temperature differential that drives ice dam formation.
This is why addressing attic heat loss solves two problems at once: lower heating bills and eliminated ice dam risk.
Insulation alone won't stop ice dams if you have major air leakage paths. Air carries heat with it—lots of it. And the biggest leaks aren't where you think.
Most homeowners worry about drafty windows and doors. Those are real, but they're not the worst offenders. The largest air leaks are hidden in your attic, behind insulation where you can't see them without pulling back the material.
🚩 Recessed Lighting
Why it's a problem: Older recessed lights (called "can lights") without IC-rated airtight housings create a direct opening between your living space and attic. Warm air pours through them.
Scale: Each non-IC can light can leak as much air as leaving a window cracked open several inches, 24/7.
🚩 Attic Hatch or Pull-Down Stairs
Why it's a problem: Most attic access points have no weatherstripping and minimal insulation. They're essentially a large hole in your ceiling.
Scale: An unsealed attic hatch can account for 5-10% of your home's total air leakage.
🚩 Plumbing Stack Penetrations
Why it's a problem: Plumbing vents and drain stacks pass through the attic floor. The gap between pipe and framing is often unsealed or poorly sealed with material that has shrunk or degraded.
Scale: Warm air flows up around these pipes continuously, drawn by the stack effect.
🚩 Chimney Chase
Why it's a problem: The framing around your chimney where it passes through the attic often has large unsealed gaps. Building codes require clearance from combustible materials, which means gaps by design.
Scale: This can be one of the single largest air leakage points in your entire house.
🚩 Top Plates of Interior Walls
Why it's a problem: Interior walls connect to the attic floor but don't form an airtight seal at the top plate. Warm air from the wall cavities flows directly into the attic through these unsealed joints.
Scale: Collectively, these small gaps around the entire perimeter add up to major leakage.
🚩 Furnace Flue or Duct Penetrations
Why it's a problem: HVAC ducts, furnace flues, and bath fan exhausts all penetrate the attic floor. The gaps around these are often large and completely unsealed.
Scale: Leaky ductwork in unconditioned attics loses heat through both air leakage and conduction.
Important: Adding more insulation on top of unsealed air leaks doesn't solve the problem. Air will still flow through the gaps, carrying heat with it. Air sealing must come first, then insulation. This is why professional energy audits start with blower door tests—they reveal where the hidden leaks actually are.
What Pushes Heat Loss Higher vs. Lower
Not all homes lose heat at the same rate. Understanding what makes your situation worse (or better) helps you prioritize the most effective improvements.
What Pushes Heat Loss UP ↑
- ↑ Attic insulation below R-30 (especially below R-20)
- ↑ Compressed or damaged insulation with gaps and voids
- ↑ Multiple large unsealed penetrations (recessed lights, chimney chase)
- ↑ Leaky or uninsulated ductwork running through attic
- ↑ Single-pane windows or failed double-pane seals
- ↑ Uninsulated or minimally insulated exterior walls (pre-1950 homes)
- ↑ Cathedral ceilings with inadequate insulation depth
- ↑ High indoor thermostat settings (greater temperature differential)
- ↑ Complex roof lines with valleys, dormers, and multiple planes
- ↑ Poor attic ventilation causing moisture and insulation degradation
What Keeps Heat Loss DOWN ↓
- ↓ Attic insulation at R-49 to R-60 (recommended for northern climates)
- ↓ Complete air sealing of all attic floor penetrations before insulating
- ↓ IC-rated airtight recessed light housings or LED retrofits
- ↓ Insulated and weatherstripped attic hatch with dam around perimeter
- ↓ Modern double or triple-pane low-E windows
- ↓ Sealed and insulated rim joists in basement
- ↓ Proper attic ventilation (continuous soffit and ridge vents)
- ↓ Simple roof design with minimal penetrations and valleys
- ↓ HVAC ducts and equipment located inside conditioned space
- ↓ Energy-efficient programmable thermostat with reasonable setpoints
The Stack Effect: Why Warm Air Wants Out
Understanding the stack effect helps explain why attic air sealing is so critical and why simply adding insulation isn't enough.
The stack effect is the movement of air in and out of buildings driven by temperature differences between inside and outside. Warm air is less dense than cold air, so it rises. In winter, this creates positive pressure at the top of your house (pushing air out) and negative pressure at the bottom (pulling air in).
Your house effectively becomes a chimney. Cold air infiltrates through lower openings (basement rim joists, foundation cracks, lower-level windows). As it warms and rises, it exits through upper openings (attic penetrations, upper-level windows, roof vents).
The greater the temperature difference between inside and outside, the stronger the stack effect. This is why ice dam problems and heating bills are both worst during the coldest stretches of winter—you're fighting maximum air pressure differential.
Why this matters for ice dams:
The stack effect actively pushes warm air through any opening in your attic floor. If you have unsealed penetrations, warm air is continuously flowing up through them and heating your roof deck—even if you have decent insulation covering those gaps. Air movement carries far more heat than conduction through materials. This is why air sealing the attic floor is often more impactful than doubling insulation depth.
Taller homes experience stronger stack effect. Homes with significant temperature stratification (warm upper floors, cool basement) also see increased pressure differentials driving air movement.
How to Diagnose Where Your House Is Losing Heat
You can identify major heat loss areas without expensive equipment. Here's how to conduct your own preliminary assessment.
Visual Attic Inspection
When: Cold day with snow on the roof
What to look for:
- Measure insulation depth—if it's less than 12 inches, you're likely under R-38
- Look for dark staining on insulation (indicates air leakage paths carrying dust)
- Check for gaps around penetrations—pipes, wires, ducts, chimney
- Identify recessed lights—are they IC-rated airtight housings?
- Look for frost or ice buildup on roof sheathing (sign of excessive moisture and heat)
Safety note: Only access the attic if you can do so safely. Don't step off joists onto insulation—you'll fall through the ceiling below.
Roof Snow Melt Pattern Analysis
When: Day or two after snowfall, when neighboring roofs still have full coverage
What to look for:
- Uneven melting: Bare patches indicate heat escaping in those areas
- Fast overall melting: If your roof clears days before neighbors', you have significant heat loss
- Ice dams at eaves: Direct evidence that warm roof sections are creating meltwater
- Icicles: Not just decorative—they're a red flag for heat loss and drainage problems
Benchmark: A properly insulated cold roof should retain snow for weeks after a storm, matching or exceeding your neighbors' retention.
Hand Test for Air Leaks
When: Cold, windy day
What to do: Hold your hand near suspected leak points and feel for moving air:
- Baseboards along exterior walls
- Electrical outlets on exterior walls
- Window and door frames
- Around recessed lights in ceiling
- Attic hatch perimeter
Detectable air movement indicates significant leakage that's worth sealing.
Professional Energy Audit (Most Accurate)
What you get:
- Blower door test: Depressurizes house to quantify total air leakage and locate specific leak points
- Infrared camera scan: Reveals hidden insulation gaps, thermal bridges, and air leakage paths through temperature differences
- Combustion safety testing: Ensures any air sealing work won't create backdrafting hazards with fuel-burning appliances
- Prioritized improvement list: Shows you which fixes deliver the most bang for your buck
Cost: $300-600 for a comprehensive audit
Worth it if: You're planning significant insulation or air sealing work. The audit pays for itself by ensuring you focus on the right areas.
Priority Action Plan: Where to Start
If you can't do everything at once, focus on the improvements that deliver the biggest reduction in heat loss and ice dam risk for the least money and effort.
Don't skip air sealing to jump straight to insulation. It's the most common mistake homeowners make. Air leakage undermines insulation effectiveness. Seal first, then insulate. Professional contractors who understand building science will insist on this sequence.
Common Questions About Heat Loss and Ice Dams
What part of the house loses the most heat? +
The attic is the single biggest source of heat loss in most homes, accounting for 25-35% of total heat escape. Warm air naturally rises and accumulates in attic spaces. Without proper insulation and air sealing, this heat flows directly through the roof deck, melting snow and creating ice dams in winter. Other major loss points include windows (15-25%), walls (15-25%), and gaps around doors and penetrations (15-20%).
Why is my house losing so much heat in winter? +
Most heat loss comes from three factors working together: inadequate attic insulation (common in older homes built before modern energy codes), air leakage through hidden gaps (around recessed lights, plumbing penetrations, chimney chases, and attic hatches), and unbalanced ventilation that allows warm interior air to escape while pulling cold air in through other openings. The stack effect amplifies this as warm air rises and creates pressure that drives air movement through any available path.
How does heat escaping through my roof cause ice dams? +
Heat escaping through your attic warms the roof deck from below. This melts the bottom layer of snow on your roof even when outdoor temperatures are below freezing. Meltwater runs down the roof until it reaches the cold eaves where there's no heated space below. There it refreezes, forming a growing ridge of ice that blocks drainage. Subsequent meltwater backs up behind this ice dam and eventually finds its way under shingles and into your home.
Can I stop heat loss without replacing my insulation? +
Air sealing is often more important than adding insulation and can be done without full attic insulation replacement. Sealing gaps around recessed lights, plumbing stacks, electrical penetrations, and the attic hatch can reduce heat loss by 15-30%. However, if your attic has less than R-38 insulation (about 12-13 inches of fiberglass or 10-11 inches of cellulose), adding insulation after air sealing will deliver significant additional benefits and help prevent ice dams.
What's the connection between my heating bill and ice dams? +
If you're paying high heating bills and getting ice dams, you're literally watching your money melt snow on your roof. The same heat escaping through your attic that drives up your energy costs is also creating the temperature differential on your roof that causes ice dams. Addressing heat loss through proper insulation and air sealing simultaneously reduces energy costs and eliminates the root cause of ice dam formation.
Should I focus on windows or attic first? +
Focus on the attic first. Attic improvements (air sealing and insulation) typically cost $2,000-5,000 and address the primary cause of both ice dams and high heating bills. Window replacement costs $8,000-20,000 for a typical home and won't prevent ice dams. Once your attic is properly sealed and insulated to R-49+, then consider windows. The exception is if you have single-pane windows in very poor condition—in that case, adding storm windows provides a cost-effective middle ground.
Will more attic ventilation solve my ice dam problem? +
No. Attic ventilation is important for moisture control and shingle longevity, but it won't solve an ice dam problem caused by heat escaping from below. The root cause is heat loss from living space into the attic—ventilation doesn't address that. In fact, adding ventilation without fixing insulation and air sealing can sometimes make ice dams worse by introducing more cold air that creates temperature imbalances. The correct sequence is: seal air leaks, add insulation, then ensure proper ventilation exists (continuous soffit and ridge vents).
How long does it take for insulation improvements to pay for themselves? +
Attic air sealing and insulation typically pay for themselves in energy savings within 3-7 years in northern climates, depending on your current insulation level, heating fuel costs, and how leaky your home is now. But the financial calculation misses the bigger value: eliminating ice dams prevents water damage that can cost $5,000-15,000 to repair (or more). If you're currently dealing with recurring ice dams, proper attic improvements often pay for themselves in avoided damage after just one or two winters. The energy savings are a bonus on top of that.
Need Help With Ice Dams This Winter?
Understanding where your house loses heat is the first step. Stopping the damage ice dams cause is the next. Ice Dam USA uses professional low-pressure steam equipment to safely remove ice dams without damaging your roof—and we can help you understand the long-term prevention steps that will solve the root cause.
